Apple|9 minutes Read
How to Transfer Data From an Old iPhone to a New iPhone Without Losing Anything
Ethnickoti

Getting a new iPhone is exciting right up until the moment you realize your entire digital life is trapped inside the old one. Photos from five years ago. WhatsApp chats you forgot mattered. Notes, passwords, weird screenshots, unfinished reminders. Everything.
And honestly, this is where people start stressing out.
The good news? Apple has made iPhone transfers dramatically easier over the past few years. Much easier than the old iTunes era where one wrong click felt catastrophic. In 2026, most transfers happen almost automatically if you know which method fits your situation.
Still, there are a few details people miss. Tiny things. Like why some apps log you out afterward. Or why transfers suddenly freeze at “1 minute remaining” for half an hour. That part catches a lot of people off guard.
This guide walks through the safest and smoothest ways to move data from an old iPhone to a new one without losing photos, messages, apps, or your sanity somewhere in the middle.
A little prep saves a surprising amount of frustration later.
Make sure both iPhones are updated to the latest iOS version available. Transfers between devices running very different software versions sometimes become painfully slow or incomplete. Not always. But often enough.
Also check:
Wi-Fi is stable
Bluetooth is enabled
Both phones have decent battery life
You remember your Apple ID password
That last one matters more than people expect. A lot of transfers pause because someone suddenly realizes they haven’t typed their Apple password in two years.
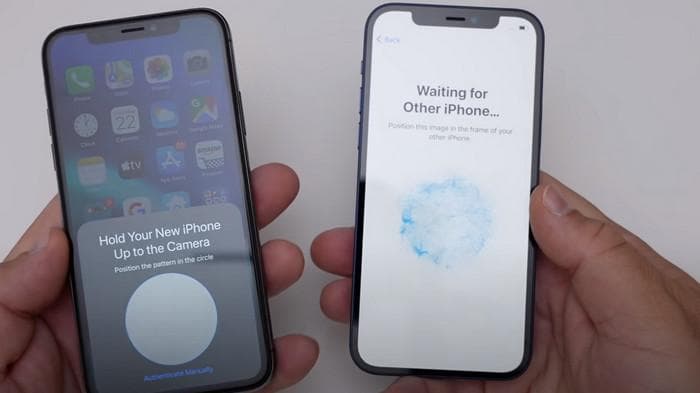
If your old iPhone still works properly, use Apple’s Quick Start feature. Seriously. It’s the cleanest method for most people.
Apple designed it to feel almost invisible. You place two phones near each other and the system handles most of the work quietly in the background.
Turn on the new iPhone and place it beside the old one.
Within a few seconds, a popup should appear on the old device asking if you want to configure the new iPhone. Tap Continue.
Then comes the floating blue animation. You scan it using the old iPhone’s camera. It feels slightly futuristic the first time you do it.
After that:
Enter your old iPhone passcode on the new device
Set up Face ID or Touch ID
Choose “Transfer from iPhone”
Then wait.
And this part matters: keep both phones charging and don’t separate them too far. People underestimate how sensitive the transfer can be if one device drops Wi-Fi temporarily.
A 30-minute transfer can suddenly become a two-hour headache if one phone disconnects halfway through.
Photos and videos
Messages and iMessages
Most apps
Contacts
Safari tabs and bookmarks
Device settings
Apple Watch pairing
Usually, it feels almost identical once finished. Familiar. That’s the goal.
This surprises people every single year.
Even after a successful transfer, some apps won’t carry over login sessions for security reasons. Banking apps are especially strict. Password managers too.
You may need to re-enter:
Bank credentials
Two-factor authentication codes
Corporate VPN settings
Streaming service passwords
That’s normal. It doesn’t mean the transfer failed.
Sometimes the old iPhone isn’t available. Maybe the screen is broken. Maybe you already traded it in. Maybe it fell into water and now behaves like a haunted object.
That’s where iCloud backups help.
On the old iPhone:
Settings → Apple ID → iCloud → iCloud Backup → Back Up Now
Wait until the backup fully finishes. Don’t rush this part.
If you have a huge photo library, backups can take quite a while. Especially on slower internet connections.
During setup on the new iPhone:
Choose “Restore from iCloud Backup”
Sign into your Apple ID
Select the latest backup
Your iPhone will begin restoring apps and data gradually.
This method works well, though it’s usually slower than direct phone-to-phone transfer because everything downloads again from Apple’s servers.
Also, don’t panic if apps appear gray for a while. They often reinstall in the background for several hours.
This method feels a bit old-school now, but it’s still extremely useful for large backups or unstable internet connections.
Especially if you have 300GB of photos and videos sitting on the old device.
Connect the old iPhone to your Mac
Open Finder
Select the iPhone from the sidebar
Choose “Back Up Now”
Connect the new iPhone
Select “Restore Backup”
If possible, create an encrypted backup. That preserves more sensitive data like saved passwords and Health information.
Windows users can still use Apple Devices or older iTunes-based backup systems depending on setup.
There’s a strange moment during many transfers where progress appears frozen forever.
“1 minute remaining.”
Then… nothing.
Usually, the transfer is still working behind the scenes. iPhones are terrible at estimating remaining time accurately during large data migrations.
Still, if it truly freezes for more than an hour, try:
Restarting both iPhones
Moving closer to the router
Disabling Low Power Mode temporarily
Updating iOS first
And yes, public Wi-Fi during setup is usually a bad idea. Airport transfers are especially risky. Too many interruptions.
People care about this more than almost anything else now.
If WhatsApp backup is enabled properly through iCloud, chats generally restore without major issues. But don’t erase the old phone immediately after setup.
Open WhatsApp on the new device first. Verify:
Messages are present
Media files loaded correctly
Voice notes work
People sometimes rush to factory reset the old phone and realize later something didn’t sync completely.
That’s not a fun discovery.
Pause for a minute before wiping the old device.
Seriously.
Check the new iPhone carefully:
Photos visible?
Messages transferred?
Banking apps working?
SIM or eSIM active?
Apple Watch connected?
Only after confirming everything should you erase the old device.
To do that:
Settings → Apple ID → Sign Out
Then:
Settings → General → Transfer or Reset iPhone → Erase All Content and Settings
This removes Activation Lock properly before selling or trading in the device.
Modern iPhones increasingly rely on eSIM rather than physical SIM cards.
Sometimes carriers transfer automatically during setup. Sometimes they don’t. Carrier support still varies wildly depending on country and network.
If mobile service doesn’t appear immediately, don’t panic. You may simply need to reactivate the eSIM through your carrier’s app or QR code system.
It’s one of the few parts of iPhone setup that still feels oddly inconsistent.
Moving from one iPhone to another used to feel risky. These days it’s mostly smooth, though small hiccups still happen here and there.
Quick Start remains the easiest option for most people because it transfers nearly everything with minimal effort. iCloud backups help when the old phone is unavailable, while computer backups still make sense for massive storage libraries or slower internet connections.
The biggest mistake people make isn’t choosing the wrong method.
It’s rushing.
Give the process time. Double-check your data. Keep the old iPhone around for a day or two before erasing it completely. That little bit of patience saves a surprising amount of regret later.
Ethnic Koti Editorial Team. (2026). "How to Transfer Data From an Old iPhone to a New iPhone Without Losing Anything". Ethnickoti Blog. Retrieved from https://ethnickoti.com/blog/how-to-transfer-data-from-old-iphone-to-new-iphone
Join the conversation. Be respectful and helpful.